Intro to Terraform and how it is related to test automation infrastructure

In this post, we will take a closer look at one of the most popular infrastructure-as-code software tools developed by HashiCorp, and if you follow my recent content, that name should start ringing a few bells.
So, what is Terraform and why do we need it?
Terraform allows you to define and describe your infrastructure in the form of code. To be more specific “HashiCorp declarative configuration language” (or HCL in short). With Terraform you can manage your resources and infrastructure modules like servers, VPCs, security groups, and much more, even if they are located on different providers such as AWS or Azure.
Generally speaking, cloud providers have their own infrastructure-as-code tools like CloudFormation or ARM. But, Terraform has very extensive support for different cloud providers and platforms allowing you to use a single tool for cross-cloud configurations. This makes it easier to manage your resources, easier to onboard and this is a scalable and in general, the “best practice” way to work.
So how is that related to test automation infrastructure?
In my previous article, I talked about how you can build your own custom Amazon machine image (AMI) and described an example of an executor for Test Automation. As we saw, the produced AMI is intended to be a template for multiple servers that would be spun up on AWS as our cloud vendor. Now, let’s take that example one step further.
Imagine you need to spin up a small cluster of selenium server nodes (executors for test automation). These servers will have complexity and very specific requirements.
For example, they need to:
Be created from a specific AMI ID. (In our case probably the latest promoted version).
Have a specific type and capacity.
Be deployed in a specific account, a specific VPC, a specific region, a specific availability zone to have access to dedicated resources and be accessible by the automation http sessions.
Specific rules for inbound and outbound internet access.
Specific tags to be able to filter them for maintenance, monitoring, cost, ownership, and more.
Now obviously, that’s all doable manually via the AWS management console. You can navigate, log in, and manually set up all of your resources and deploy your server. Having said that, this is basically unmanageable in scale, prone to human errors, and totally unmaintainable.
So let’s see how this can be managed in Terraform.
Define and create your basic test automation executor infrastructure using Terraform.
For this example, I will define and deploy a selenium server to AWS.
To get started you would need:
Terraform Installed (*Described below)
VSCode, with the Terraform extension installed to get Syntax highlighting which will not come out of the box.
Python 3.6.0 or later installed (*Required for the next bullet)
AWS CLI installed.
AWS credentials which you can create on the AWS console in the IAM section.
Installation on Mac.
To install Terraform on Mac just use Homebrew:
$brew install terraform
Verify installed with:
$terraform --version
Install AWS CLI:
$pip install awscli
Verify installed with:
aws --version
Configure AWS credentials for access.
$aws configure
You will be prompted with a request to enter your access key and secret key.
Export your access key and secret key
$export AWS_ACCESS_KEY_ID=your_access_key_id
$export AWS_SECRET_ACCESS_KEY=your_secret_access_key
Creating your Terraform configuration
The first step would be creating your main configuration file. For that purpose, I have created a new .tf file and called it main.tf.

As you can see from the screenshot, In the main.tf file you can see 3 main blocks.
The Terraform block: This block contains your Terraform settings, including the required providers it will use to provision your infrastructure. In our case, we will only need aws.
The Providers block: This block configures the specified provider you want to work with. A provider is essentially a plugin that Terraform uses to create and manage your resources, in our case as you can see we only need one. We are also defining the region in which we would like to deploy our instance. In our case, it is “us-west-1”.
The Resources block: Resource blocks are used to define components of your infrastructure.
As you can see in the attached screenshot, Resource blocks have two strings before the block is opened - the resource type and the resource name. In this example, the resource type is aws_instance and the name is selenium_server. The Resource blocks contain arguments used to configure the resource. We are choosing to spin up an EC2 type m5.large from an AMI ID we promoted earlier which is stored in AWS.
For the sake of the example, we are also adding tags to our instance. Why you might ask?
Well, to be able to filter them in the EC2 dashboard, to mark that this EC2 has been created by Terraform, and to scope the workload as “automation” to be able to tell our stakeholders the monthly cost of our automation execution infrastructure.
Now, this is a fairly primitive example and you would need to build on top of that by defining your desired security groups with egress and ingress rules and ranges, replace the static AMI IDs with dynamic latest AMI versions, etc… but for the sake of simplicity let’s move forward and I will leave it to you to fill the obvious gaps.
Using Terraform to deploy your resources
Now, we need to initialize the directory to download and install your specified Provider plugins.
Open a terminal and navigate to the directory where your main.tf file is stored and execute:
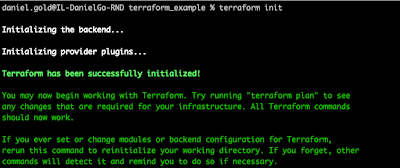
$terraform init
If you get a similar output, you have successfully downloaded the provider plugins and initiated state monitoring and we can now start using what we wrote.
The next thing we would need to do is to validate that the configuration we have created is valid and correctly formatted. So from the terminal within our working directory let’s execute:
$terraform validate

It seems that our configuration is legit, and we can move forward to deploying.
Take a look at the AWS EC2 dashboard. As you can see, I have no instances currently running that match my filters:

Now, we can apply our configuration to spin up our server. From the working directory execute:
$terraform apply
As you can see below, it prompted a confirmation message to confirm my desired deployment and once I typed “yes” and hit enter, after a few seconds it stated that the “apply” task had been completed successfully.

Now let's go to our management console and check if we have what we expected to see.

Success!
So, let’s summarize.
In this post we have learned about Terraform, what it is, and what it is used for. We also saw an example of how we can use Terraform to create, configure, and manage our infrastructure. Obviously, this is just the tip of the iceberg and there is much more functionality and a lot more stuff to learn with this powerful tool as it lets you follow up on state, edit, and destroy resources.


Comments
Post a Comment